|
 |
 |
 |
 |
 |
 |
||||||||||||
Vespa Post 1979 Large Frame Engine WorkInstalling a Piston |
Piston InstallOne of the most important parts of a well operating engine is a good piston and bore to keep compression high and transfer that power to the back wheel. Basic tolerances between a piston and a bore are typically 0.2mm. If you remove your barrel and find deep scoring on the piston and bore it is definitely time for a new piston. Pistons cost between $45 and $70 depending on what bike you are buying for. Whenever a new piston is installed it is important to rebore the barrel to the next oversize if there is major scoring of the surface, or at least hone it to be sure that the wear ridge at the top is removed. The one pictured is from a PX150 motor. The following images show the piston replacement after removal of the old barrel and piston, and in these images the engine is out of the frame but it is not a requirement.
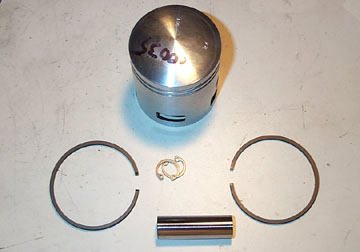
A piston kit comes with two
rings, a wrist (or gudgeon) pin, and two wrist pin circlips. The first
step is to be sure that the ring diameter is correct for the bore of
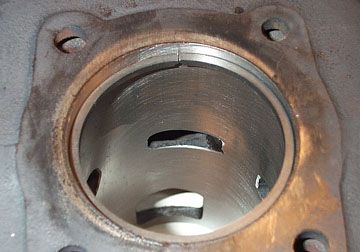
the barrel. The barrel must be rebored or honed to get a uniform
surface on the bore. Piston tolerances can differ slightly and when a
ridge at the top of the barrel may be present at the upper range of the
piston ring travel. If you simply replace the piston it is possible
that the new piston maybe slightly taller and the rings can strike the
ridge and fracture.
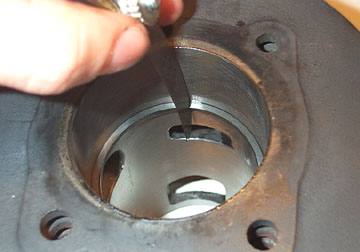
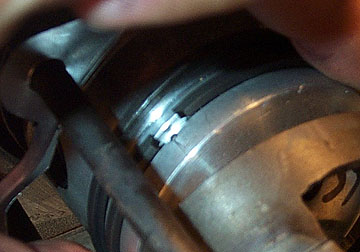
Take either one of the rings
and fit it as squarely as you can in the top of the barrel bore. When
the rings get hotter they expand and it is critical to be sure there is
enough room for expansion otherwise there is risk of a seizure.
With the piston ring in the
bore slide the piston down in the bore skirt first. This will push the
ring down in the bore and keep it square to the diameter of the bore. I
usually push it down until the wrist pin hole is about central with the
top of the barrel.
Remove the piston and get out
a set of feeler gauges. The minimum ring gap is 0.2mm. Measure this gap
by fitting a feeler gauge in between the ring ends. If it is less than
this you will need to remove the ring and use a very fine file or
sandpaper to slightly increase the end gap. Once you are happy with the
gap, slide the piston down as you did before and push it through the
bore to remove the ring. Check the second ring in the same manner.
Have a look at the piston and
look at the ring grooves. In each one there will be a ring peg set in
the upper surface of the groove. Look at the ring ends and you will see
that there is a special cut out in the ends to go around this peg.
Carefully stretch the rings one at a time over the piston and into the
grooves making sure the ends fit into the ring pegs.
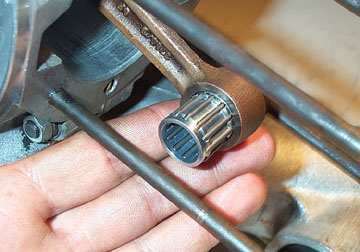
This motor had a very loose
small end bearing so I replaced it. At $5.95 it is a safe precaution
when rebuilding the top end. Vespa crankshafts are marked with one to
four score lines on the end of the con rod which note the inner small
end diameter. Basically for some strange reason these are reversed. If
you have 1 score you need the 4th oversize small end, 2 scores = the
3rd oversize, 3 scores = 2nd oversize, and 4 scores is the ist
oversize. Your scooter dealer will be able to set you up with the right
bearing if you tell them the scores or show them the crank.
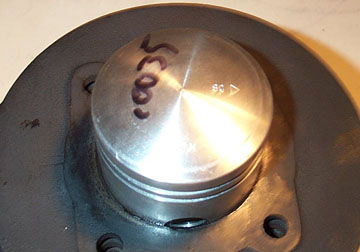
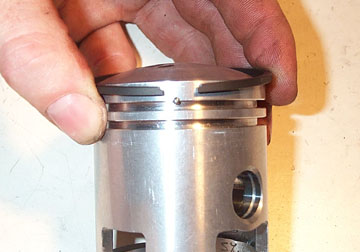
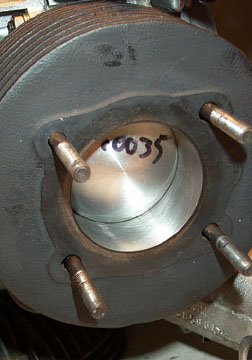
Look at the top of the new
piston. There should be a mark "SC" with an arrow pointing away from
the center of the piston. This shows where the exhaust port should be
when the piston is correctly installed. The exhaust in all large frame
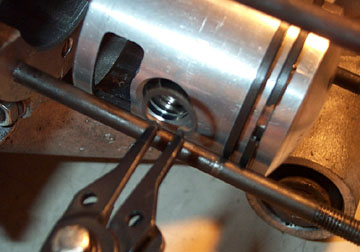
engines faces down out of the barrel. Slide the piston over the end of
the con rod with the small end bearing installed. You may need to heat
the piston with a hot rag before sliding the wrist pin into place, or
it can be drawn through with a bolt if required. Most new pins will
just slide right in without too much force.
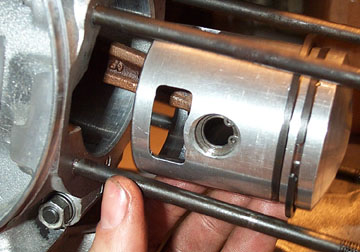
Using circlip pliers, fit the
circlip to either end of the wrist pin. These can go in any way round
but they must drop fully into the groove. Remember that there is a
circlip required at both ends of the pin.
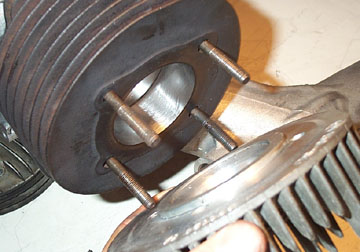
Above is a shot of a piston
with the circlips installed correctly.
With the piston installed
correctly, you can slide the thin metal base gasket down over the
cylinder studs. A 200cc motor has a different base gasket than the one
shown. The P125X and P150X share the same base gasket as shown above.
With the base gasket in place
you can move on to installing the barrel. Smear some two stoke oil
around the bore of the barrel to help with the installation, and
provide some lubrication when the bike first starts up. Carefully slide
the barrel down until it meets the piston. This is were things get a
little tricky and it helps to have a helper to help compress the rings.
Basically you need to compress
the rings into their grooves so that the ends hit the piston pegs. This
would be pretty easy except that there are two rings to do and the
barrel tries to slip off the piston whenever possible. Use your fingers
to compress the rings and then slip the spigot over each ring at a
time. Once the barrel slides down make sure the piston is travelling
freely by rotating the flywheel while holding the barrel down.
Rotate the piston at least one
full revolution to be sure everything is working smoothly.
Clean out the existing
cylinder head before installing it. Wet dry sandpaper or valve grinding
compound works well to polish the surface after any obvious carbon
deposits have been removed. On a 125 or 150cc engine can be installed
in any direction, but the correct direction is with the spark plug hole
up when looking at the motor from the front.
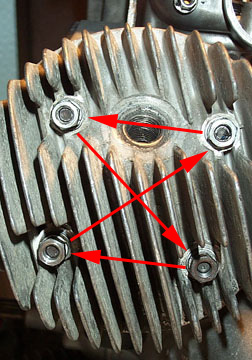
Fit a washer, lock washer ,
and nut to each stud and hand tighten them down. In order not to warp
the head, the nuts should be tightened only about 1/2 a turn before
moving to the next nut. The final torque for 125cc and 150cc motors is
xxxx, and for 200cc motors it is xxx. Finally, fit the spark plug,
cylinder shroud connector nut, cylinder shroud, and start the motor up.
For the first 300 miles you should drive very carefully, do not over rev the motor, stay at low RPMs where possible, and vary the engine RPM when stuck in any single gear because of road conditions. Breaking in a piston carefully is the best way to ensure long life from your top end. |
|||||||||||||||||