|
 |
 |
 |
 |
 |
 |
||||||||||||
Vespa Post 1979 Large Frame Engine WorkFlywheel Removal |
Flywheel RemovalThe flywheel serves as a weight that allows the engine to move through the compression stage when there is no power being produced by the engine. When a two stroke has finished the combustion stage and the piston is traveling down, the crank doesn't have enough rotational inertia to go past bottom dead center and go into the compression stage. The flywheel is heavy enough that to stop it rotating is less force than is required to move the piston up to the combustion stage. Lighter flywheel motors (like on tuned bikes) usually have a higher idle rate because the flywheel needs to be spinning faster to move the piston with the same amount of force. Anyway - Flywheel removal is necessary when you want to adjust the timing, remove the stator or split the casings. On P-series bikes it is an easy task - you'll need:
Remove the right hand side cowl for access to the motor. There are a series of bolts that retain the flywheel cover which need to be removed. These are arrowed below.
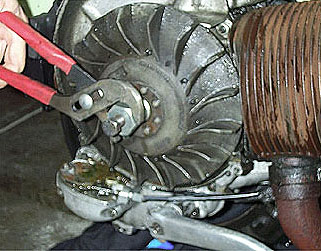
Once these are removed the central 19mm nut has to be loosened. You'll find that the flywheel is a tapered fit on the crank and it is impossible to remove the nut without somehow stopping the flywheel from rotating. I have jammed everything from screwdrivers to wrenches into the flywheel fins to stop it but the actual tool for the job makes it a snap. The tool fits into the access hole and allows the 19mm socket to pass through the center as shown below. This is a standard thread nut so it must be unscrewed in a counter clockwise motion.
Once the nut is removed a puller must be used to force the flywheel of the crank taper. The inside face of the flywheel nut recess is threaded to take this tool, and there is an extractor bolt which can be tightened to push the flywheel off the end of the crank. The end of the puller is hexagonal so it can be held in place with a large wrench or pliers as shown below. The center bolt can then be tightened until there is a small pop. This sound is when the flywheel finally breaks its force fit with the crank and it can now be removed completely. There are powerful magnets in the flywheel to generate electricity and these may make the flywheel feel like it is stuck on something, but it should pull off to reveal the stator with minimal effort.
I usually leave the flywheel puller in the flywheel until I am ready to reinstall it. It also keeps the lock washer secure because it can't go anywhere. When the flywheel is fully removed you'll see a small woodruff key in the crank taper (or it may fall out). A woodruff key is a small D shaped piece of metal that fits into a keyway in the crank taper. The flywheel also has a slot for the key and this makes sure that the flywheel can only be installed in one position. This is very important because the flywheel position, in relation to the piston, must be fixed in order for the spark to fire at the right time. At this point you should have the stator visible as shown below. If you are working on a P125 or P150 the stator will look different from the one pictured below.
For more on timing see the timing section in tips and tricks. Next Section --> |
|||||||||||||||||