|
 |
 |
 |
 |
 |
 |
||||||||||||
Lambretta Engine WorkGeneralLambretta |
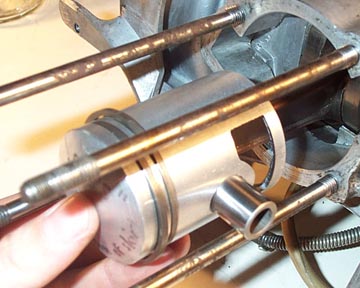
Piston InstallOne of the most important parts of a well operating engine is a good piston and bore to keep compression high and transfer that power to the back wheel. Basic tolerances between a piston and a bore are typically 0.2mm. If you remove your barrel and find deep scoring on the piston and bore it is definitely time for a new piston. Pistons cost between $45 and $70 depending on what bike you are buying for. Whenever a new piston is installed it is important to rebore the barrel to the next oversize if there is major scoring of the surface, or at least hone it to be sure that the wear ridge at the top is removed. The one pictured is from a GP125 motor. The following images show the piston replacement after removal of the old barrel and piston, and in these images the engine is out of the frame but it is not a requirement.
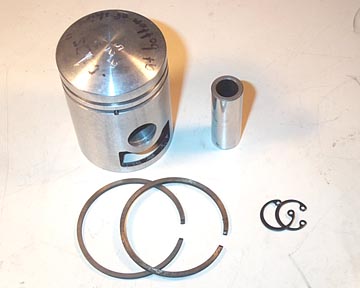 A piston kit usually comes
with the piston, two new rings, a wrist (or gudgeon) pin, and two
circlips. On the piston above you can clearly see an arrow stamped in
the top facing to the left of the image. When the piston is installed
this must be facing the exhaust.
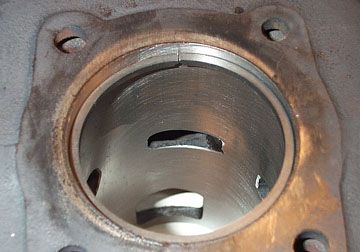
Step 1 - Checking the ring
gap: Take either one of the rings and fit it as squarely as you can
in the top of the barrel bore. When the rings get hotter they expand
and it is critical to be sure there is enough room for expansion
otherwise there is risk of a seizure. With the piston ring in the bore,
slide the ringless piston down in the bore skirt first. This will push
the ring down in the bore and keep it square to the diameter of the
bore. I usually push it down until the wrist pin hole is about central
with the top of the barrel.
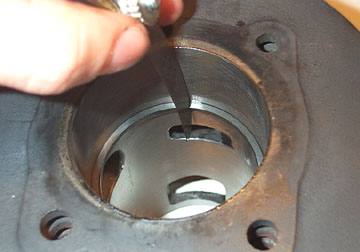
Remove the piston and get out
a set of feeler gauges. The minimum ring gap is 0.2mm. Measure this gap
by fitting a feeler gauge in between the ring ends while making sure
the ring is not in any port windows. If it is less than this you will
need to remove the ring and use a very fine file or sandpaper to
slightly increase the end gap. If it is more than this you may need to
buy new rings for your piston. Once you are happy with the gap, slide
the piston down as you did before and push the ring through the bore to
remove the ring. Check the second ring in the same manner.
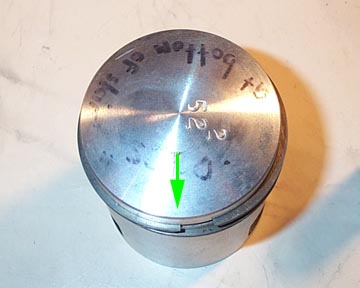
Step 2 - Preparing the
piston: Before the piston is installed, the rings must be put on
the piston. Both rings are the same so it doesn't matter which one goes
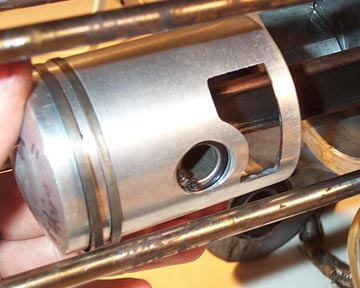
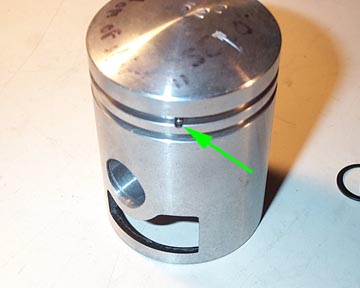
on first but it does matter which side faces "up". Have a look at the
piston ring grooves and you'll see small peg in each groove shown with
the green arrow above. The peg is not central to the groove and is set
closer to one edge so that only half the peg circle extends into the
groove. Now have a look at the ends of a piston ring. If you slightly
compress it with your fingers you'll see that the same half circle
space is cut out of the ring ends.
Make sure you have the piston
ring the right way up for the groove you are setting it in. Carefully
stretch open the ring so it can fit over the piston and slide it down
the sides until it fits the groove. I usually fit the lower ring first
as it is harder to get the lower ring over and already installed upper
ring. Do a final check to make sure both rings fit well and their ends
interface with the pegs.
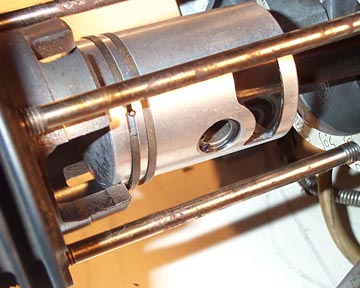
Above is a shot of the lower
ring correctly installed for reference. Fit the upper ring in the same
manner.
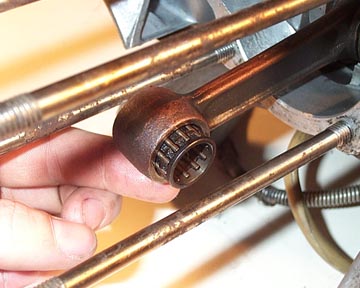
Step 3 - Installing the
piston: Fit a new small end bearing or (on older models) a brass
bushing. Use a little two stroke oil to lubricate it. The images above
are of an engine which is actually upside down from the way it would be
installed in a bike as it is easier to work on and balances itself on
the engine mounts. Please keep this in mind when following the steps if
your engine is still in the bike.
Look on the piston head for an
arrow stamped in it. This MUST face towards the exhaust port or
directly down towards the ground in a motor still mounted in a bike.
Before fitting the piston you
may need to heat it with a hot wet rag to allow the wrist pin to fit
more easily. Press the wrist pin in only far enough that it stays in
place and then take the entire piston assembly and center the wrist pin
hole over the small end hole. Carefully push the wrist pin through the
caged needle roller small end bearing and through to the other side of
the piston. When fitted correctly both sides should have an equal depth
from the pin end to the face of the piston.
Using circlip pliers, fit both
circlips to either side of the pin. Make sure they are fully seated in
the groove in the piston. You don't want these coming loose in a
running engine. Since this picture was taken I have learned more info
and all circlips should be installed so that they have the ends either
up towards the piston head or down towards the piston bottom, that way
there is no way for the clip to get squeezed by the accelertion of the
piston, and pop out.
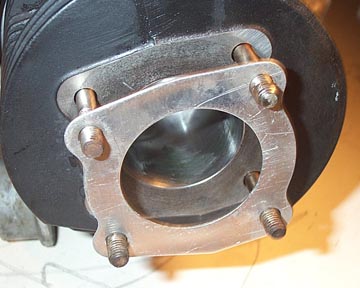
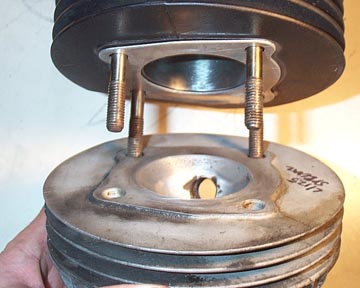
Step 4 - Installing the barrel: Slide a new base gasket over
the piston. This gasket will only fit one way due to the cylinder studs.
Clean and check the bore for any dust or any other
contaminate. Rub some two stoke oil around the bore for lubrication.
Carefully start to slide the barrel on to the cylinder studs.
The barrel can only fit one way and goes on with the spigot (the part
that sticks out past the fins) towards the casing. Once the spigot has
come down on the piston enough to hit the first ring, you'll need to
compress the ring to get it into the barrel.
Make sure that if the rings have rotated, their ends are back
in line with the ring pegs. Carefully compress the rings with your
fingers while sliding the spigot down over the piston. Once one ring is
in the barrel you can switch to the second ring and use the same idea.
Slide the barrel all the way down over the piston and turn the flywheel
to make sure the piston travels freely in the bore.
Once the barrel is in place, and has been pushed down on to
the casing, you can install the single aluminum head gasket. This only
fits one way due to the cylinder stud layout.
Fit the head to the cylinder studs...
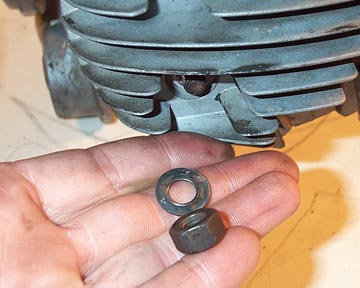
...and add the washer and nut to each stud. A single stud
(shown in the next picture with a green arrow) receives the special
coupler nut that the barrel cowling bolts into. Tighten the nuts only
hand tight for the time being.
This image has been flipped to show how the head looks if the motor is installed in the frame. Tighten the head nuts about 1/2 a turn each and then alternate to the next one in the pattern shown above. This system makes it very unlikely to warp the head when tightening. The green arrow shows the location of the coupler nut. Finally, fit the spark plug, cylinder shroud, and start the
motor up.
Note: For the first 300 miles you should drive very carefully, do not over rev the motor, stay at low RPMs where possible, and vary the engine RPM when stuck in any single gear because of road conditions. Breaking in a piston carefully is the best way to ensure long life from your top end. A typical new piston with new rings and a rebore should develop about 125 to 140 PSI compression which can be tested with a spark plug threaded compression tester available from most auto parts stores. |
|||||||||||||||||