|
 |
 |
 |
 |
 |
 |
||||||||||||
Vespa Small Frame Engine WorkClutch Removal |
Clutch RemovalThe clutch on all small frame Vespas is located on the rear wheel side of the gear shaft. There is an access cover which can be removed while the engine is still in the bike but the rear wheel and backplate have to be removed to gain access to the cover. To remove the clutch you will need:
If you are going to replace the clutch plates you'll also need:
 The first step is to set the bike over so that the right hand side is on the ground. Before you tip it over it is a good idea to run the carb dry by starting it with the gasoline valve off until it stalls because of lack of gasoline. What this is doing is using up all the gasoline in the float bowl so when it is on its side the carb will not leak. Also open the fuel filler cap and put a piece of plastic bag over the hole and tighten the filler cap down again. This blocks the breather hole so gasoline should not leak when the bike is horizontal. The scoot will rest on the right hand side grip and the kickstart lever, but you may want to put down a pillow if you have nice paint work. Â
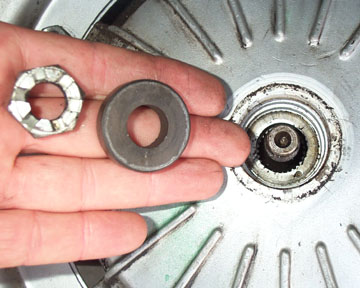
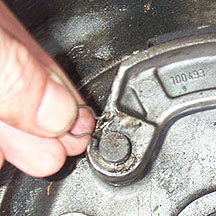
Pry off the central nut cap with a screwdriver to expose the axle nut underneath. Remove the split pin and discard it. Â
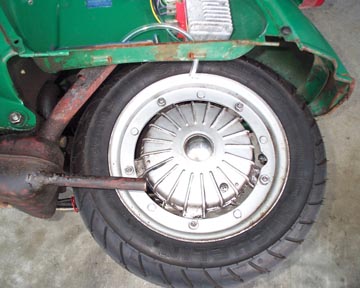
Use a 22mm socket to remove the castelated axle nut. It may be stubborn so you can have a friend hold the rear brake pedal down while you crank on the nut. Once it is loose, remove it along with the thick rear axle washer (as shown above) and place them somewhere safe for the reassembly. Â
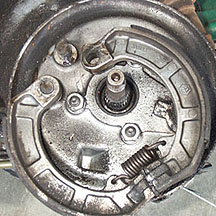
With the nut removed, the entire wheel rim, tire, and hub can be removed. It is a tight fit past the exhaust pipe but a little wiggling will get it clear. To get to the clutch on a small frame the rear hub backplate must also be removed along with the brake pads. Â
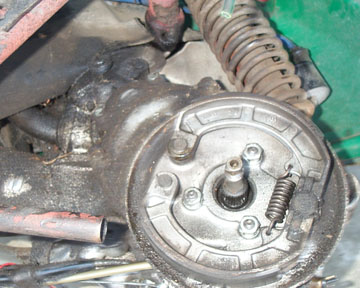
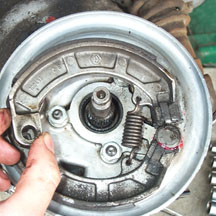
The brake shoes are held on with two small clips at the pivoting end of the shoes. At the other end is a spring between the two shoes. Pull off the pivot clips with a small screwdriver and make sure they don't go shooting off into the depths of the garage. Once they are off use a large screwdriver in between where the shoe touches the activator cam to lever the brake shoe away from the cam. Once it is clear you should be able to pull the shoe off the pivot point by pulling equally on each end. Once one shoe is free the other is very easy to remove. Â
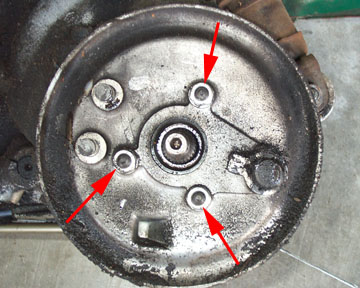
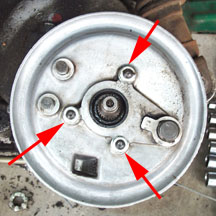
The rear wheel backplate is held to the casing by three 13mm bolts. Each bolt should have a washer and a locknut. Remove each nut and the backplate can be lifted off the casing to reveal the rear axle bearing. The rear brake cable does not need to be disconnected. The bike must remain horizontal from this point on as the gearbox oil can leak out of the main axle bearing if it is put upright before all the work is done. Â
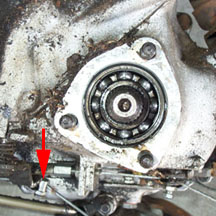
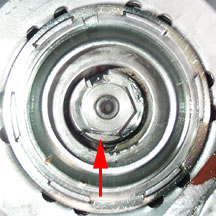
At this point the clutch cable needs to be disconnected from the clutch arm (shown arrowed above). There is no need to remove the nipple from the cable, just unhook the entire end of the cable from the clutch arm. You may need a screwdriver to get the leverage necessary to move the clutch arm enough to unhook the cable. Â
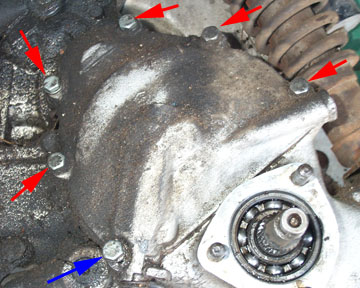
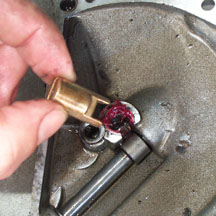
Using a 10mm socket, loosen the six bolts shown above. The one that is arrowed in blue is longer than all the others, so remember this when reassembling the bike. Clean around the join between the clutch cover and the casing so that no dirt falls into the gearbox when the cover is removed. Carefully lift off the cover and look out for the brass activating plunger which may be left sitting on the center of the clutch. If it is not, look for it inside the clutch cover.
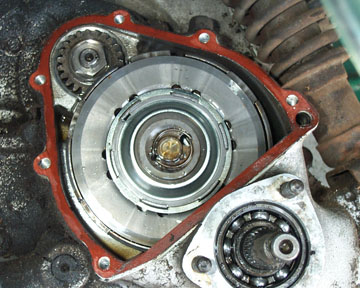
The clutch should now be exposed. Be very careful working around it with your tools. If you drop anything into the casings now and it falls into the lower gearbox, you'll need to split the casings to get it out. Â
To remove the pressure plate, use a small screwdriver to move the small wire spring in the direction of the arrow in the left image above. Once the wire is pushed in as shown, the plate can be lifted out at end where you are using the screwdriver. It will then expose the single 14mm clutch nut and locking washer. The washer is bent up against one side of the nut to stop it rotating. Use a screwdriver and hammer to bend it clear of the nut before loosening the nut with a 14mm socket. The clutch will try to turn while you loosen. There is a Vespa tool to hold the clutch in place which is the proper way to do things, but I have found a large screwdriver usually does the trick if you are careful. It can be wedged between the outer basket of the clutch and the engine casing, but be careful not to damage either with excessive force. Â
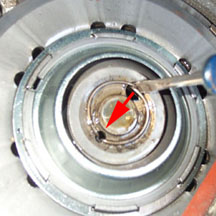
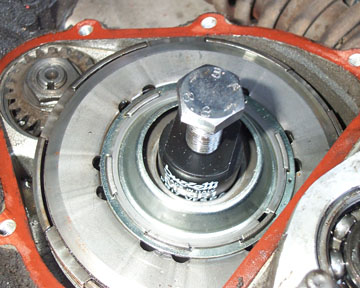
The picture above shows the 14mm nut and the special tabbed locking washer removed from the clutch. Small frame motors have a tapered clutch side gear shaft end, so the only way to get the clutch off the gear shaft is with a special clutch puller. Â
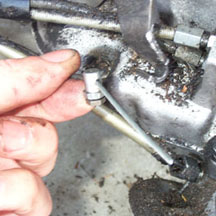
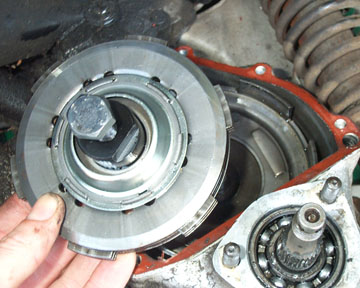
The clutch puller tool threads into the clutch body, and then a second bolt is tightened, forcing the clutch off the gear shaft. Use an adjustable wrench around the body of the puller, and a socket and driver on the bolt. Â
Once the puller has done its job the clutch can be removed from the bike. Be careful to find the small woodruff key that locates the clutch on the crank. It is a small half moon shaped piece of metal that fits into a slot on the gear shaft. On this bike it came out with the clutch, but on most bikes it should stay in the gear shaft end. Keep it for the reassembly process. If you plan to rebuild and replace clutch parts, go to the small frame clutch rebuild page.
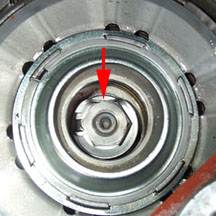
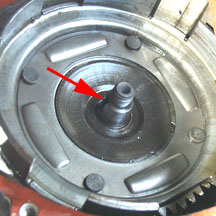
Fit either a new or the used woodruff key to the gear shaft end where arrowed above. This key only locates the clutch. Once the clutch nut is tightened the tapered shaft will hold the clutch in place similar to a flywheel set up. Fit the clutch back in the motor, making sure the keyway slot in the clutch aligns with the woodruff key in the gear shaft. The outer clutch basket can spin independently to the gear shaft and you can rotate it so that all the clutch plate tabs fall within the cutouts in the basket.
Refit the tabbed washer, making sure that the tab locates properly in the slot. This is required so that the tab doesn't try to spin. Refit the 14mm nut and tighten it up. Use the same method of stopping the clutch from rotating as you did before. If you use a screwdriver make sure it rests against the clutch basket and not the cork plate tabs as it can distort them. Once the nut is tight, get a screw driver and bend part of the washer up against one side of the nut to stop it rotating as shown above in the image to the right.
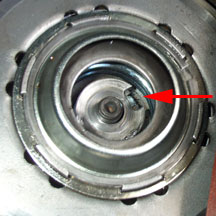
Have a look at the inside of the clutch cover. Remove the brass plunger by activating the clutch arm by hand. Add a little grease to the bore and fit it back in. The grease will help the plunger from falling out when you turn the clutch cover over to fit it back against the casing. Before fitting the cover have a look at the gasket. It is always best to replace the gasket, but if it looks good and you want to get the project done, go ahead and use the old one. Tighten up the 10mm bolts (remembering the one long one) and reconnect the clutch cable end to the clutch arm. Try pulling the clutch lever at the headset. It may need adjusting with the small threaded adjuster due to the fact that the new plates are not worn.
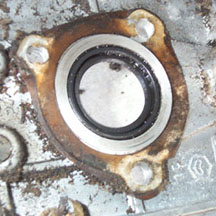
Flip the backplate over to examine the rear wheel oil seal and gasket. As always, it is best to replace both the gasket and the seal. The seal is a press fit and the small circular spring should face the transmission. You may have to peel back the oil seal lip to see the spring if you are unclear which way it should face. Refit the gasket and move the backplate into place. Tighten the three 13mm nuts and if you feel like it, give the backplate a good cleaning.
Grease each brake shoe pivot, grease the cam, and refit the shoes. Fit the small retaining clips on the brake shoe pivots. Smear a little grease on the oil seal before fitting the entire hub and rear rim/tire. Fit the large thick rear axle washer, followed by the axle nut. Tighten it as tight as you can, but make sure that some of the holes in the axle align with the nut so that you can fit a new split pin. This is one area where it is necessary to use a new item. This may be the only thing that stops the wheel from falling off in the future and it is very cheap. Always bend the ends in either direction as shown above. Lastly, fit the chrome axle cap. Remove the plastic bag over the filler cap or the engine will periodically stall. Take it for a spin and adjust the clutch cable if necessary. Next Section - - >Â Â |
|||||||||||||||||