|
 |
 |
 |
 |
 |
 |
||||||||||||
Vespa Small Frame Engine WorkShift Cross Replacement |
Shift Cross ReplacementThere are a number of different things that can cause a small frame bike to jump out of gear while riding, the most likely of which is the shift cross. You'll need:
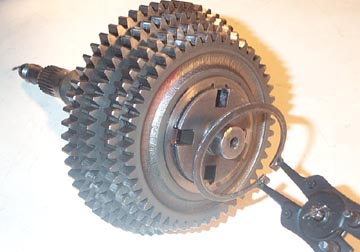
The images below show a four speed Primavera gearbox but the idea is the same for bikes with three gears although the actual cross is different. Also the shift crosses differed in some years of production so check with your scooter shop to make sure you have the right cross for your bike. To get to the shift cross you'll need to split the casings, and remove the rear axle. Unfortunately the shift cross cannot be replaced with the axle in place like large frame bikes...
Once the gears and axle are out of the casing you can start removing the gears from the axle. To do this, remove the single circlip from the end of the shaft...
...followed by the single shim. Keep these in a safe place because the circlip can be reused and often times the shim can too. With these removed the gears will be free to be pulled off the shaft. When you are taking the gears off the shaft make sure you stack them in the same order, or better yet, put a zip tie through them all so the order can't be changed. They have to go on in the same way they came off and it is easy to forget which way they came off.
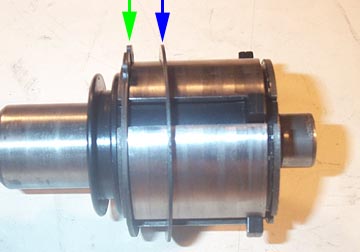
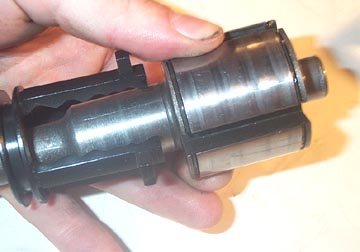
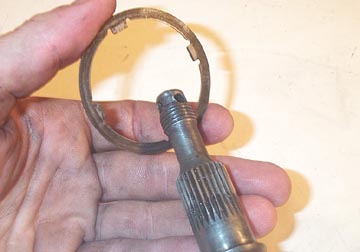
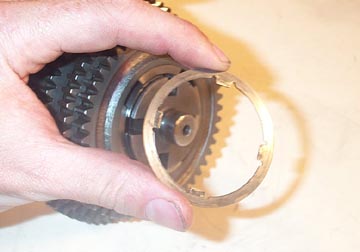
On the other end of the shaft there is another shim (blue) and circlip (green) which need to be removed. These slide off in the direction of the rear wheel as the shift cross tabs stop them coming off in the other direction.
Now here is the tricky bit which can sometimes send things flying. Inside the axle there is a strong spring and two ball bearings which are kept in place by two legs of the cross. I usually put a rag over the axle to make sure they don't shoot off into the depths of the garage when the cross is removed. To remove the cross pull it off the axle towards the rear wheel. It will move in jumps as the ball bearings move to the next groove, but should come off with a little work. If you are not replacing the spring then you can use a little trick sent to me by an email: Borrow or buy another cruciform and slide it feet first onto the shaft as the original one is removed. As the old one clicks out of the last slot, it will click into the first slot of the borrowed cruciform. Then, put the new one in place of the one you just removed. Click it back over the bearing assembly and you're done.
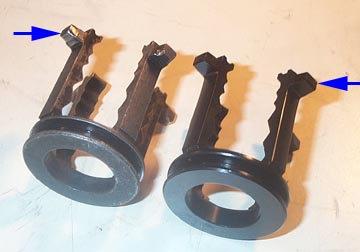
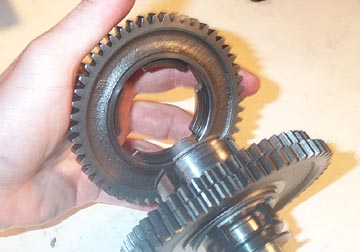
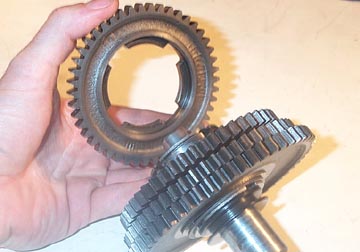
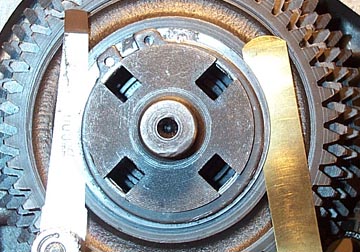
Above is a shot of the area on the shift cross which gets worn. The one on the left is the old cross and the one on the right is the new one. To make sure you have the same cross set them both on a level surface with the circular part flat on the surface as there are two different types used - a 50mm and a 51mm depending on your engine. Not much of a difference but a 51mm in a 50mm engine won't work. Make sure they are the same height and have the same amount of "bumps" on each leg. It is an easy check and is much better than installing the wrong part so deep in the engine.
Install the spring in the central hole in the axle. I usually install one of the ball bearings to start with as shown above. Push these into the hole so the spring is poking out the other side but the bearing is flush with the groove.
Put the new shift cross over the rear wheel end of the axle and slide it up. The next step is installing the last ball bearing which is a real pain.
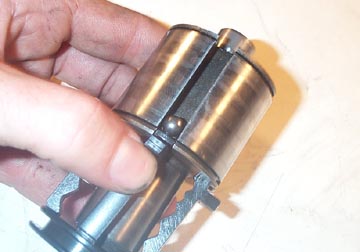
My way of doing this is to put the shift cross on slightly titled so it can hold the lower ball bearing in place with the tab, but you are still able to install the last ball bearing on the other side. If you have one, clamp the axle in a vise and carefully compress the second ball bearing into the hole with the face of a flathead screwdriver. When it is below the face of the axle, quickly move the shift cross over it. Take your time - when you are done it should look like the axle above.
Start rebuilding the gears by sliding one of the shims over the rear wheel end of the axle, followed by the circlip. This shim may need to be replaced but we won't know until the gears are on the axle (you can always measure this before you remove all the gears in the manner shown at the end of this section).
Before you install the gears have a look at the teeth around the perimeter, and the areas where the tabs hit the shift cross. Now is the time to replace them if there is obvious wear. With both the shim and the circlip in place start to fit the gears. In case you've forgotten the orientation of the gears I have tried to take an image that clearly shows which way it goes. This is first gear going on with the tabs closer to the rear wheel.
Second gear goes on with the tabs away from the rear wheel. This gives the cross a place to rotate freely without engaging any gear (neutral).
Third gear is followed by...
..the fourth and final gear which has its tabs facing away from the rear wheel.
Fit the same shim as before, followed by the circlip which locks all the gears in to place.
The gears have a specific limited amount of play which is controlled by fitting different thicknesses of shims. The shims should be replaced together with the next oversize. To measure the tolerance use two feeler gauges on either side of the flywheel side shim as shown above. The tolerance should be between 0.15 - 0.40mm. Anything more than this will mean removing both shims and getting the next oversize from your scooter shop.
To reinstall the axle into the casing, move the shift cross as far away from first gear as you can as shown above.
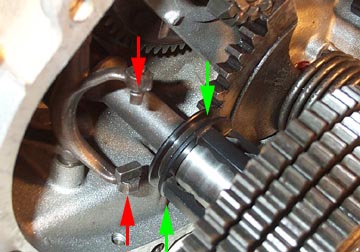
Slide the axle into place and you'll see two small feet (shown in red) that must slot into the groove in the shift cross before the axle can be hammered through the rear wheel bearing.
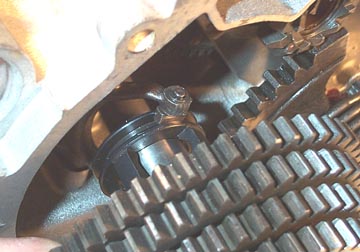
The above shot shows the shift cross properly aligned with the shifting tabs and just starting to get tight in the rear wheel bearing.
Use a socket or another type of spacer to hammer the axle through the rear wheel bearing. Make sure whatever you use does not rest on the small tip of the shaft, but rest on the large outside face instead. The tip fits into a bearing in the flywheel side case, and if it is damaged you may have problems refitting the case halves. If for any reason during the rebuild, you removed the rear hub backplate, make sure it is in place and tightened down before you hammer the axle through. It is the only thing that holds the rear bearing in place and stops it from moving as you hammer. |
|||||||||||||||||