|
 |
 |
 |
 |
 |
 |
||||||||||||
Vespa Pre 1979 Large Frame Engine WorkDropping the engine |
Removing the engineThe bike in these pictures is a Vespa 150 but it had been retrofitted with an engine from a later 150 Super. The images should be pretty close to most 60s and 70s large frame Vespas.
The first step it to remove the right
hand side bodywork to get access to the engine.
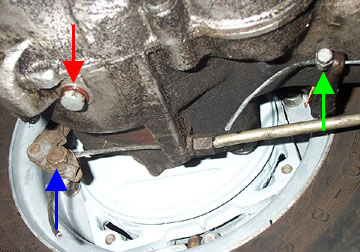
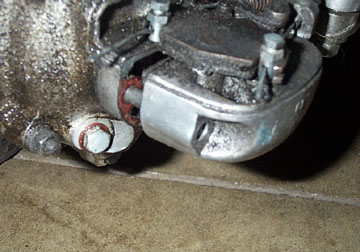
The engine oil can be drained more
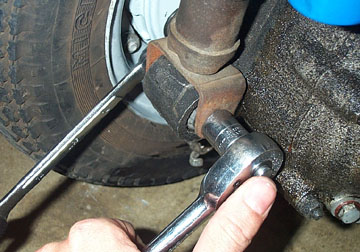
easily with the motor in the frame. All control cables, electrics, and
fuel/oil lines must be disconnected. Starting on the underside of the
motor, locate the rear brake nut (blue arrow), clutch nipple (green
arrow), and the oil drain plug (red arrow). Loosen the rear brake nut
and slide the inner cable through the hole in the center of the bolt.
Then slide the cable outer through the adjuster in the engine casing so
that the cable is completely free of the motor. The clutch cable should
follow in the same manner.
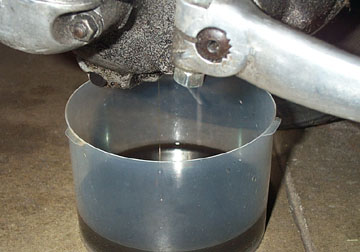
Place a suitable container under the
bike and remove the oil drain bolt from the casing. Oil will drain out
until there is none left. I usually refit the bolt so it doesn't get
lost. Remember, it is very easy to strip the soft aluminum casing with
the bolt so tighten it only about 1/4 turn past finger tight.
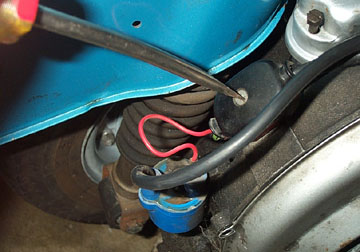
Find the junction box on the top of the
engine casing near the fan. If your bike has a battery, be sure to
disconnect it or just pull the fuse. Loosen the single screw and remove
the top of the junction box.
Make a quick sketch of the connections
and then remove the frame wires from the junction box connections. Once
it is disconnected make sure the wires are not clipped to the motor at
any point before they disappear into the frame.
Loosen the two screws on either end of
the carb box and remove the cover.
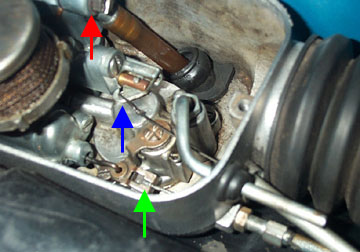
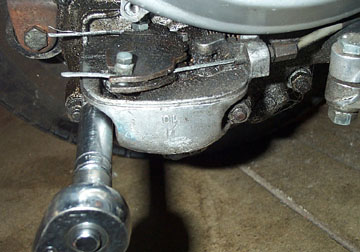
The fuel line is connected to a barbed
inlet on the carb shown with a red arrow above. Turn the fuel lever
under the seat to the off position. To remove the fuel line connection
either carefully push it of the barbed inlet which is sometimes very
tough, or use a 10mm wrench to remove the entire inlet with the fuel
line connected. This can make it easier to remove the barbed inlet
since you can get to both sides of it. The choke cable (blue arrow) and
throttle cable (green arrow) must also be removed. They simply unhook
from the carb although sometimes it is helpful to twist the throttle
grip to get some slack in the cable. With these cables both removed,
push them back through the carb box so that they are completely free.
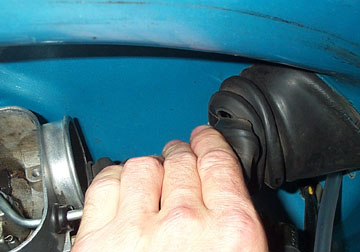
Pull the soft rubber bellow from the
carb box. I usually pull off the other end connected to the frame too
as it makes a handy place to stuff all the loose cables.
Take all the electrical wires, the fuel
line, and all the control cables and stuff them in the frame hole to
keep them out of the way.
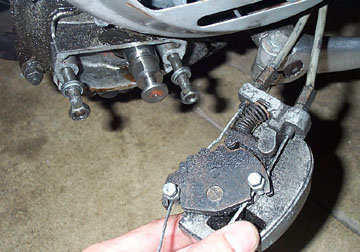
Now move down to the selector box and
find the single screw under the fan cover that holds the cover in
place. Remove the screw and the cover, and use an 11mm socket to loosen
and remove the two nuts, split washers and flat washers from either
side of the selector box.
Place a rag under the selector box as
the next step usually spills a little residual oil. Once the nuts are
off, twist the gear selector headset twist grip to 3rd or 4th gear and
the selector box should push away from the engine casing.
Carefully pull the selector box away
from the casing. If it won't come free have a look inside and try to
wiggle it so the small foot comes out of the groove in the gear
selector plunger. The selector box and both cables should be able to be
pulled clear of the motor.
Using a 14mm wrench and a socket (or two wrenches), remove the
rear shock nut and push it through the mount so it can be fully
removed. If you can't push it try clamping vice grips on the head of
the bolt and pulling.
The final step to dropping the motor is removing the single
front motor pivot bolt. Use a socket on the glove box side and a wrench
on the motor side to stop the bolt from turning.
Once the bolt is loose but not removed, sort out some way to
support the scooter without relying on the back wheel. A milk crate or
toolbox under the rear frame works well. In this shot you can see that
the milk crate has actually raised the frame up enough to allow the
shock mount to pull free.
Carefully remove the main pivot bolt by either pulling it out
at one end or carefully banging it out from the other, being careful
not to damage the threads. If you have a helper available this is a
good point to get some support under the engine, but watch those hands
when the bolt comes free!
With a little luck and some twisting the motor can be pulled
clear of the frame.
The motor is now ready for more intense work than what can be
carried out with it still in the frame. |
|||||||||||||||||