PM Tuning Exhaust - Large Frame Vespa
Putting on a PM
Tuning exhaust for a large frame bike
is a pretty easy job but there are a few things to know. Firstly here
is what is included with the pipe:
- 3x part pipe (stub from barrel, main
body, and exhaust can)
- 3x nylon locking nuts for the exhaust
can
- 2x springs to connect the pipe parts
together and allow it to pivot for changing the rear wheel.
- 1x U-bend clamp. I've heard these can
be dangerous on Malossi kits which have a cast exhaust stub, but they
are fine on standard barrels.
- 1x mounting bracket and all
associated hardware
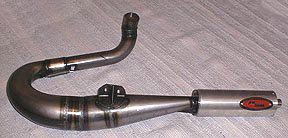
The pipe comes from PM Tuning either as
unfinished steel or chrome. The one I got was unfinished and it started
rusting just from handling. In the pictures below there is some surface
rust but I eventually bought some 500F heat resistant clear spray,
sanded down the pipe, and sprayed everything but the exhaust can which
is was aluminum.
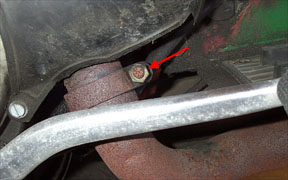
The first step is to remove your old box
style exhaust which is held in place by a single 13mm nut at the barrel
stub and another 14mm which passes through the swing arm. The swing arm
bolt is a little annoying as it will almost come out but then hits the
rear tire. You can either deflate the tire or remove it to get this
free - we removed it for the pictures.
With a little twisting and turning the
exhaust should drop off the barrel stub. If it is stubborn try heating
the stub, tapping the edge with a hammer and screw driver, or soaking
it in a solvent.
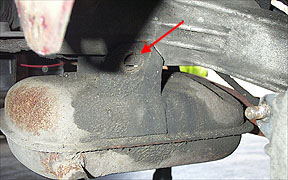
Once the old exhaust is off the new PM
mounting bracket can be installed. You'll need a nut for the existing
swing arm exhaust bolt as the original Vespa exhaust has one built in.
On my brother's bike (pictured) the mount fit well but on my P200
engined VBA I had some problems. The
flange should be facing out towards the spare wheel side as shown below.

At this point we put the rear wheel back
on. This pipe does allow for a spare tire with some spacers on the
spare tire mounting. It also hinges at the spring point so that the
tire can be removed to change it without removing the entire system
At this point you may want to modify your kick stand or it is possible to do it later. Place the U-bend
clamp on the barrel end of the pipe, but leave it loose. With the bike
on the kickstand fit the pipe to the barrel, and slide it on as far as
it will go. Loosely tighten the nuts just enough so it won't slide off.
Use the included 2 small bolts and nuts to connect the main pipe body
to the mounting bracket. There is also a small foam spacer that goes
between the bracket and the main pipe to help reduce vibration. Once
everything is fitting well, tighten up all the nuts.
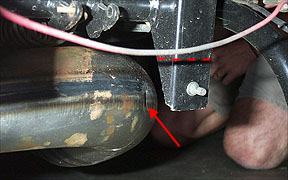
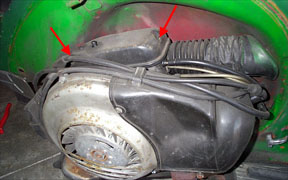
As you can see from the picture below
the kick stand on a P series bike does not work with the new pipe. We
didn't know this at the time, tried to take the bike off the stand, and
ended up with a nice dent in the new pipe (shown with the arrow)!! The
solution is to cut about 1" (2.5cm) or so off the bottom of the left
hand side stand buffer as shown with the dotted line.
The last step is
to replace the main jet for a larger one and to change the spark plug
to a different grade. PM Tuning recommends a 118 main jet to replace a
standard 116 jet on a P200 and an NGK B85EGV spark plug. Replacing the
plug is a simple matter of unscrewing the old plug and dropping the new
one in. The main jet is located within the carb body at the end of a
three part brass jet assembly. Remove the right hand cowling to get
access to the carb box and remove the screws arrowed in the picture
below.
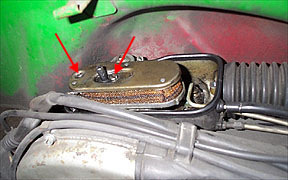
Once the carb box top is off the air
filter will be exposed. There are two screws which hold the filter to
the carb body which need to be removed. They are arrowed in the picture
below.
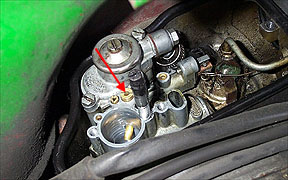
With the filter off the tops of the jets
are visible. Remove the largest one (arrowed below) by unscrewing in a
counter clockwise motion.
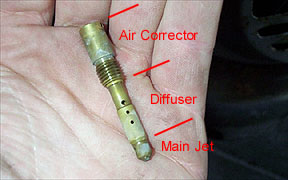
The jet is made up of three parts and
the main jet is the small tip of the assembly. To remove it just poke a
wire or something through the hole and pull it from the diffuser tube.
This is just a friction fit and should pull out pretty easily. Fit the
new jet and refit the jet assembly in the carb body. The orientation of
the jet does not matter so the hole can point any direction. See below
for a detailed view of the main jet assembly.
Once all these items are reinstalled the
scoot should be ready for a test run. Be careful to monitor the plug
color once the pipe has been installed. A lean mixture can be created
with a pipe which can destroy the engine. The plug should be a
chocolate brown when the engine is set correctly.
|


