|
 |
 |
 |
 |
 |
 |
|||||||||||
Vespa Engine WorkGeneralVespaBearings Installing a Crank |
Installing a Vespa P Series crankThis section assumes that you have already split the casings and removed the old crankshaft from the main bearing. These pictures are all from a P200E engine and older models have a different bearing set up. The first thing you should always do is to replace the clutch side oil seal. This part is cheap but will cause you big headaches if you leave the old one in and it fails. Purchasing a new crank is pretty easy. Most scooter shops have them in stock and can fit the flywheel side race noted below for a small price. It is wise to change both crank bearings located in the crankcases if there is excessive play. The main bearing on the clutch side can be removed by taking off 2 nuts and tabs and a retaining clip visible once the oils seal is removed. It can then be driven out with a large socket of equal diameter to the outside race. European or non-autolube models have a large retaining clip instead of the tabs. The flywheel side bearing has 2 parts - an internal race which is tightly fitted to the new crankshaft and a caged needle bearing set into the flywheel side casing. To remove the casing side of the flywheel bearing remove the flywheel side oil seal (which should also be replaced), and gently heat the casing with a blow torch, shown below.
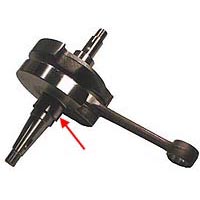
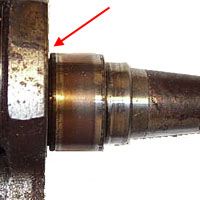
The easiest way to remove the bearing is to find a socket which is the right diameter to align with the outside lip of the bearing and hit it out in the direction of the crank with a hammer. Since this bearing will be going in the trash anyway you can also use a flat head screwdriver and tap around the outside lip. Be careful not to scratch the surface where the oil seal will be fitted. The new flywheel bearing can now be fitted by reversing this process and tapping the bearing in with a large socket or flat metal plate. An internal race must also be fitted to the flywheel side taper of the crank. This is an easy item for the scooter shop to fit when the crank is bought but it can also be installed with a large deep socket or correct diameter metal tube. Heating the race with a blowtorch makes installation very easy. Using the tube or socket slide the race down until it stops. At this point, lightly tap the bearing race on the crank. Heating the race will aid in this process. Make sure that the flywheel side crank web is fully supported or you will put stress on the crank pin and possibly distort a nice new crank. This race should not touch the flywheel, but be spaced of by about 0.5mm. Below is the race location on a new crank and the clearance on a dead crank.
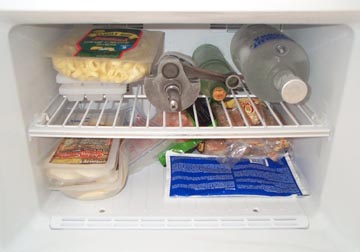
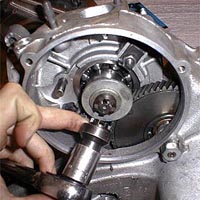
Before you install the crank, grease the lip of the clutch side oil seal so it is not damaged by the installation. Getting the crank into the main bearing race is a very tight fit. The trick I use is to exploit the fact that metal contracts and expands at different temperatures. I throw the crank in the freezer for a couple of hours and either put the clutch side casing half in the oven (make sure all flammable liquids are thoroughly cleaned form the casing) or heat up the main bearing with a blow torch.
Either way be sure that the temperature is low enough so it does not damage the clutch side oil seal! With the crank and bearing being at such different temperatures they should drop together with only your hands force. If not I have used the method below to draw the crank into the main bearing:
Use the flywheel side bearing you just removed as a spacer and make sure it fits directly over the inner race of the main bearing. Add a couple of washers so that only about a 1/4" of thread is showing.
Lastly, thread the clutch nut onto the crank and have someone hold the clutch side web of the crank. Unless it is a very tight fit it shouldn't be too hard to stop the crank from turning. As you tighten the nut with a clutch nut tool the crank will be drawn through the bearing.
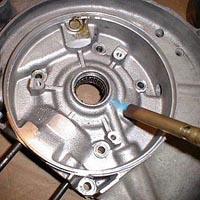
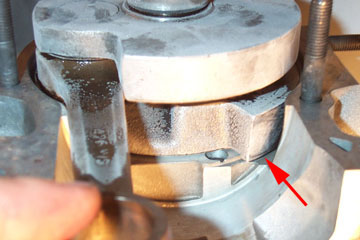
Above is a shot of the
crank correctly seated. The important part to note is that the crank
web lip fully seals and unseals the intake hole in the casing. Make
sure the lip of the crank web drops down into the groove in the casing.
If you look at the shoulder of the crank against the clutch side of the
main bearing it may not be totally flush, but as long as the lip is in
the groove the crank is well installed. The crank is all furry with ice
condensation because it was frozen before I installed it. If you use
this method and don't plan to use the engine the same day as the
rebuild, spray the crank with WD40 so the ice doesn't melt and start to
rust the crank or bearings.
|
||||||||||||||||