|
 |
 |
 |
 |
 |
|||||||||||
Frame and BodySwitches Preparation Dolly & hammer work Bondo Prep for paint Resources |
Switches - ReplacementIgnition keys were not used on most early Vespas but were introduced with the GS150 line and have been offered on most models depending on the country they are sold in, until being standard equipment on the P-Series bikes introduced in the late 70's. This section shows how to replace a P-Series ignition switch which is handy if the switch has been forced, or you have lost your only set of keys. We got the lock in the images from First Kick for about $15 with two keys. Fitting it is very simple. Note: Please bear in mind that there are 2 types of ignition keys for P-Series bike. It is always best to bring your old one to the scooter shop so it can be matched. They look the same from the outside but have different connectors inside. To replace the switch you'll need:
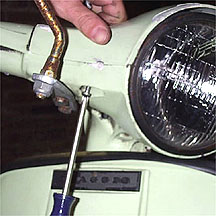
The first step is to split the headset by removing four phillips head screws from the underside. Rotating the headset from left to right makes it easy to reach them as shown above.
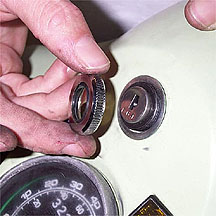
Remove the small retaining ring on the top of the ignition switch where it passes through the headset top. Usually you can unscrew this with your fingers but you made need to loosely grab it with adjustable pliers to get it going.
Once the headset top is released it is a good idea to shove the speedo cable back into the forks just below the mudguard. This will allow some slack to get in and disconnect the cable from the speedometer. With the speedo cable disconnected you can fold back the headset top leaving all the other wires connected.
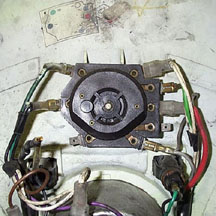
Above is a shot of a standard ignition switch off a 19xx P200E. If you click the image it will open up as a higher resolution image. Just disconnect one wire at a time from the old switch and reconnect it to the same location on the new switch. Once this is done reverse the steps above to reassemble the headset and switch. |
|||||||||||||||