Lambretta Headlight Bulb -
Changing
Lambretta headlights are held
in by four retaining screws around the perimeter on Series III bikes
and similar methods on other models. The bolt at 6:00 on the headlight
is for adjusting where the headlight beam hits the road and mine was a
bit of a mess when these pictures were taken.
You'll need:
- A small flathead screwdriver
- A new bulb (usually 6V
25/25 unless you have a 12V kit, one of the last Italian GPs, or a
later Indian bike).
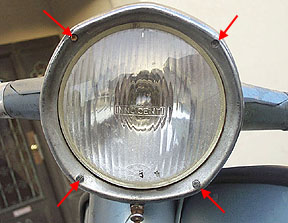
The first step is to remove
the perimeter bolts which allow the headlight bezel to come free of the
body. The bolt at the bottom which is not arrowed is an adjuster bolt
and does not need to be removed.
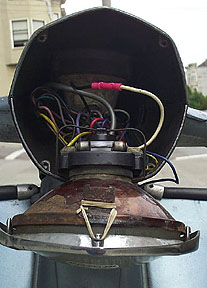
Once the screws are removed
the headlight should only be held on by the electrical connections to
the main bulb holder, and a small blue wire that attaches to the
headlight adjusting bolt. At the top of the headlight rim you can see a
rubber band between the backing flange and a slot in the rim. The
adjuster bolt pulls on this and the headlight pivots on to side pegs as
it is turned in, which adjust the headlight beam upwards.
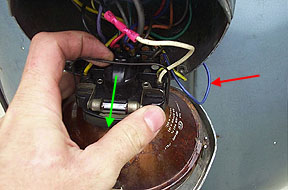
Remove the blue wire (red
arrow) from the junction box and write down where it came from or stick
something in the hole to remind you. It has a bullet type connector and
should just pull out of the junction block. There is a retaining clip
that holds the junction block/bulb holder to the headlight. Pull this
toward you and it should stretch over the holder and allow you to
remove the holder from the headlight as shown with the green arrow
above.
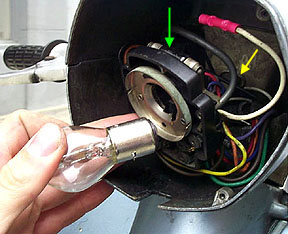
The main headlight bulb only
fits one way. Take the old bulb and push it slightly into the holder.
Once it is pushed in it will rotate about a 1/4 turn until the tabs on
it align with the bulb holder. It can then be removed and the new bulb
inserted in the reverse of how you removed the dead one. Now is also a
good time to check the pilot light, shown with a green arrow, and the
speedometer light, shown with a yellow arrow, to see if they need
replacing. Look closely at the filament (the little wire inside the
glass) and it should be continuous. If there is a break then the bulb
is blown. Typically on Series III bikes the pilot bulb is a 6V 5W festoon
type and the speedo
bulb is a 12V 2,5W smaller bulb similar in shape to a scaled down head
light bulb.
Next Section -->
|


