|
 |
 |
 |
 |
 |
|||||||||||
Electric StartAdding an Electric Start Engine: USA P Series Before Serial Number 34626 |
USA Before serial number #34626Below is a link to a .pdf file showing the way to splice the new motor and the electric start function together with the old wiring loom. We have not actually done this conversion but we have sucessfully made an electric start bike from a handmade loom so we know that the stator, battery, relay, and starter motor aspect of the diagram below will work for sure. The rest is untested but should be accurate. I'll include pictures once we do it to my brother's bike in the next couple of months. Click the image below to download the diagram.
Step 1 - Removing the existing rectifier/regulator:
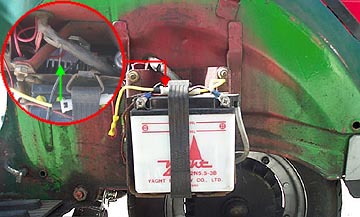
(1) Replace the rectifier/regulator with the new model from a PX200 electric start. The rectifier/regulator is located behind the battery tray under the left hand side cowl. Remove the spare tire, if fitted, by removing the two 13mm nuts at the top, and the single 14mm bolt which holds a plastic cover to the bottom portion of the spare tire. Remove the wires to the battery and remove the battery by uncliping the rubber strap. Lastly remove the battery tray by unscrewing it from the frame. (2) You will now be able to see the rectifier/regulator with two yellow wires, one pink wire, and a purple wire connected to the contacts. Unplug them all and unscrew the regulator from the frame. Keep this part as it is expensive and since you know the one you removed works, it could be valuable in the future or on another bike.
Step 2 - Replacing the rectifier/regulator: (1) You now need to splice into the purple wire which is the "switched power wire". This means that once the headset key is turned to the on position 12V runs along this wire. We need to tap into the source to get power to the relay. (2) The easiest way to do this is to cut off the spade connector that connects to the rectifier/regulator from the end of the purple wire and strip off about 1/4" of insultaion to expose the copper inside. Do the same to the 6' length of gray colored wire and twist them together. Once twisted get a new spade connector and crimp it to the twisted end. (3) Make a short black wire to run from the ground connection of the new regulator/rectifier to the frame. You will need an uninsulated spade connector for the rectifier end, and a bolt through connector at the frame end. (4) Plug in the existing wires as follows:
(5) Once all this is correctly plugged in, re-attach the regulator/rectifier to the frame. One of the screws needs to pass through the center of the black bolt through connector you made, to connect it to the frame (ground). (6) Push the end of the 6' gray wire into the grommet in the frame where all the other wires end up. You will need to get inside the frame later to pull this wire through. The rest of these steps are the same for all P series bikes so I have included them on a singele page here. Next Section |
|||||||||||||||