|
 |
 |
 |
 |
 |
 |
||||||||||
ExhaustsSmall Frame Vespas Large Frame Vespas SIP P200 Lambretta |
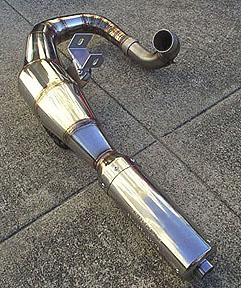
SIP P200 Exhaust for Vespa 200ccI had the pleasure of fitting a SIP P200 pipe for a friend (thanks TJ) and there is no doubt this is a really nice exhaust!! This pipe will fit a Rally 200 and any 200cc P-Series bike, but means that you will no longer be able to carry a spare under the left body cowl. It think it is ideally suited to engine transplant bikes such as a 200cc engine in a 60's style bike where the left side body cowl is a glovebox anyway.
What you will need for installation:
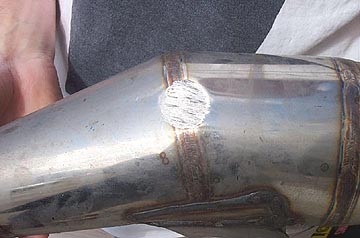
The quality of the pipe is beautiful. All the welds are extremely tight and beautifully finished off, the metal is a nice thick gauge for long life and the entire pipe is made of stainless steel so it will not rust over time. The pipe comes in two pieces: the exhaust leader and the main body. We got ours at First Kick in SF for about the same price it would be after shipping from SIP in Germany...but no waiting because they have them in stock. Included with the pipe is a powdercoated or enameled steel bracket with nuts welded to it which attaches to the engine swing arm. The bracket on the exhaust has nylon type spaces for controlling vibration, and comes with two bolts and lock washers. Also included are three springs and a small plate with two holes in it for mounting as the pipe doesn't clamp around the exhaust stub like a typical exhaust.
The first step is to remove your old box style exhaust which is held in place by a single 13mm nut at the barrel stub and another 14mm which passes through the swing arm. The swing arm bolt is a little annoying as it will almost come out but then hits the rear tire. You can either deflate the tire or remove it to get this free - we removed it for the pictures. With a little twisting and turning the exhaust should drop off the barrel stub. If it is stubborn try heating the stub, tapping the edge with a hammer and screw driver, or soaking the join in a solvent. Once this is done you will need a new 14mm nut and washer because the standard Vespa exhaust uses a built in 14mm nut for the swingarm bolt. We just decided to hack up the old exhaust to get the nut out, because the exhaust was way beyond repair.
We removed the exhaust leader from the exhaust body and fitted it to the barrel stub. SIP have incorporated only springs to secure the leader to the barrel which works well for standard barrels, and is really nice for Malossi 210 type barrels. Standard barrels have a steel exhaust stub, but Malossi barrels have cast aluminum barrel stubs that can fracture if you use a U-clamp or other constricting devices. The leader is a perfect fit over the standard exhaust stub so we used a little WD40 to slide it all the way on.
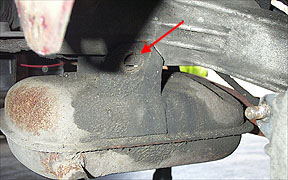
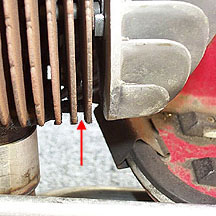
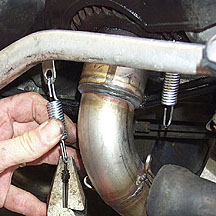
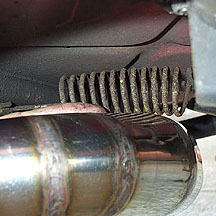
A newer type standard barrel has two pegs which connect the top two cooling fins to the lower fins as shown with the arrow in the above left picture. We chose to use the upper one because it looked like a better angle to the leader hook. One of the springs hooks through this peg and will connect to the exhaust leader once stretched, but we will deal with that after the pipe is fitted. We took the cowling shroud off the engine because we were not sure where to connect the spring, but it is not a required step. If you have an older P200 barrel there will be no pegs here and it is necessary to remove the head and drill one into the first fin (see below).
We recently installed a SIP pipe on a second P200E and found there were no pegs to hook the forward spring to, as there were on the previous P200 we used. The previous P200 had a newer engine which was installed by a scooter shop, so I guess the pegs were added on later models. We decided to remove the head and use a 1/8" drill bit to put a hole in the uppermost fin. Remove the cylinder shroud and then the head by unbolting the 4 13mm nuts, and drill a hole about 3/8" up and just to the frame side of the barrel casting lip.
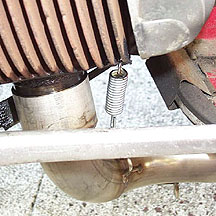
The other leader spring is held to the flywheel casing screw by a small metal plate that is included with the exhaust. These two springs connect to the hooks on the leader and are both the same length. Now on to the main body fitting.
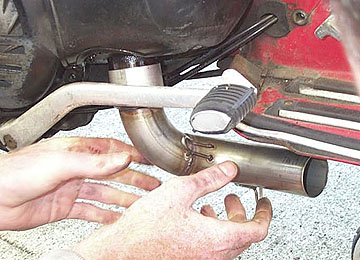
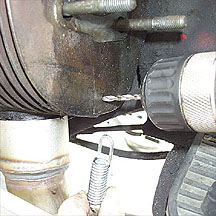
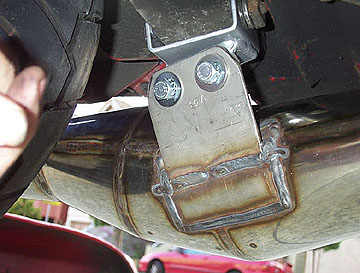
The SIP clamp can be removed from the exhaust body and the bolts should be set aside for safe keeping. It needs to be installed at a funny angle as shown in the photo above. Once installed just tighten the main 14mm bolt enough to hold it in position, but loose enough to allow adjustment of the clamp. We put our rear wheel back on after the clamp was installed. The leader can be seen in the foreground in front of the rear wheel. Before you put the main body of the exhaust on check where the stand spring connects to the floor rib just in front of the swingarm. We found that on our P200E there are a few rectangular holes in the rib for the stand spring and ours was not in the one closest to the center. The exhaust fits much better when the stand spring is in the most central hole available.
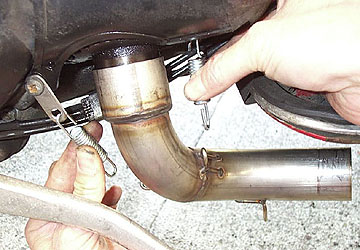
Although we didn't use it, it would make sense to add a heat resistant sealer at the joints of the pipe. The joints are extremely tight but a sealer would ensure that it is air tight. Now slide the exhaust body onto the leader and rotate it up to meet the exhaust mount. Since the springs have not been attached on the leader it should all move quite easily until the mount and exhaust align. Thread the two securing bolts by hand and then check that everything is aligned properly. Once you are happy tighten down all the bolts and you can attach all the barrel and leader springs.
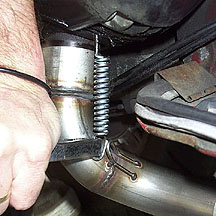
After many years of skinned knuckles I think this is the only way to do this. Use a pair of pliers and have a friend steady the bike. Grab the end very firmly and stretch the spring until it can be hooked into the leader. Use the same technique to connect the leader to body spring.
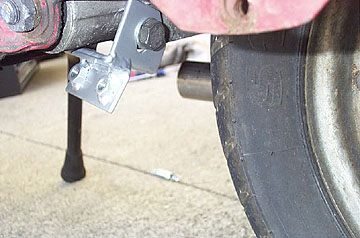
The only downside I can see about this pipe is the clearance to parts of the frame. We found the mount that receives the spare wheel plastic blank lower hits the pipe when the rear shock is compressed as shown in the upper left image. I guess this really isn't a problem because you can't mount a spare wheel here anyway with this exhaust. We also found that the stand spring rubs against the top of the pipe when the stand is extended and there is no weight on the bike. When the stand is up the spring is clear.
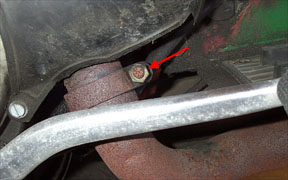
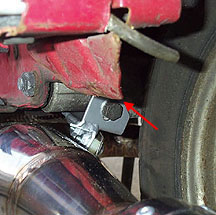
Our solution to the metal flange problem was to bend it out of the way as shown in the above left image (red arrow). If someone has this bike in the future and wants a standard exhaust and tire then they can easily bend it back. Ground clearance is good - the center of the exhaust is the first to make contact at about 50 degrees (shown with the green arrow). The final step is to change the main jet to about a 116 if it is not currently in your bike. Click here for a quick guide on how to change it.
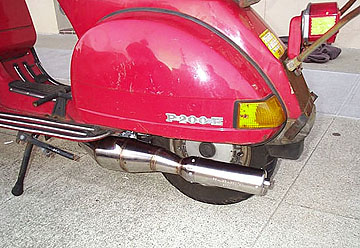
The difference it makes to the bike is really nice. It is louder than standard but still quiet enough for daily road use. First impressions where that it definitely allows the engine to rev much higher than standard in every gear and you can feel the powerband kick in at around 4500 RPM in any gear. It looks great on the bike and I would guess that it could also be polished before installation for a finish that is close to chrome but will not rust. We'll have some more info after TJ rides it for a while.
A final note: it is possible to ground out almost every exhaust on a Vespa (even the original). My brother grounded this SIP pipe out on a flat road with his wife on the back while leaning a little too hard into a corner. The biggest problem about an expansion chamber is the lack of ground clearance...so be aware. Next Section --> |
|||||||||||||||