|
 |
 |
 |
 |
 |
 |
||||||||||
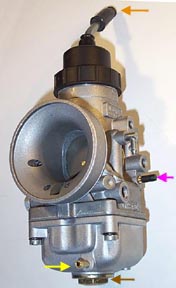
Dell'Orto Carburetors - VHSA 30mmI got an early Christmas present this year which turned out to be a 30mm VHSA Dell'Orto carb for my TS1 engine I am building. It is an interesting carb because the venturi is oval rather than round and it is physically smaller than other 30mm carbs I have seen. It is also small enough to mount to a standard TS1 manifold and still fit under standard Lambretta bodywork.
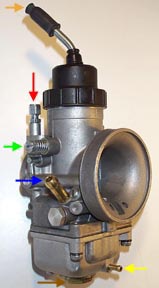
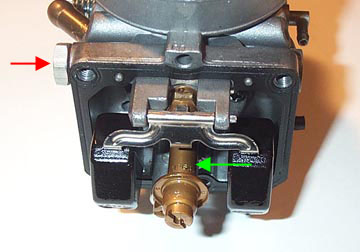
The main connections to the VHSA 30mm carb are shown above. Some of these are guesses until I actually install the carb.
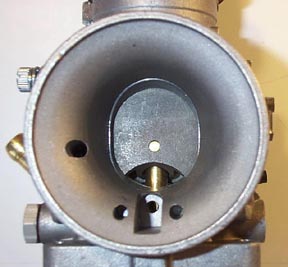
The intake venturi is oval and so 30mm
is not really an accurate dimension of the intake because that number
usually corresponds to a diameter of a circle. Below is a close up of
the intake with the throttle slide closed. The width is about 30mm but
the height is about 35mm. The oval becomes round on the manifold
connection side and has an outside diameter of 40mm which is the same
as a standard TS1 manifold.
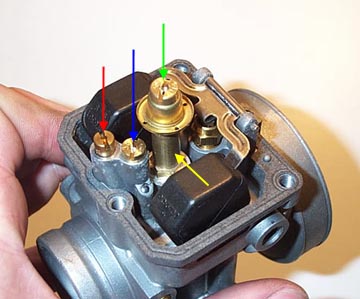
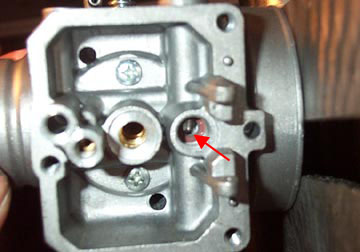
The jets are all located in the float chamber at the bottom of the carb. Above is a shot with the bottom of the carb removed to show the floats and the jet layout. These are the jet sizes that Taffspeed recommends for a TS1 225. They also included a richer and stronger jet for fine tuning. The needle and slide cannot be seen in this picture so I don't have them listed yet.
I mounted this carb to my bike as it was sent from Taffspeed for a TS1 motor and was very surprised to find it had a big flat spot in the RPM. It would start and idle with no problems but would start to splutter at about 3000 RPM. On a hill it couldn't manage to get by this spluttering, but on the flat it would roughly get through and then take off in the higher RPMs. It made the bike very hard to drive and was annoying after spending so much money on parts. I contacted Taffspeed but didn't get a response. I did, however, get a response from MB Developments who had the following fix. It turns out that the carb has a fuel starvation problem due to a couple of factors that MB Developments has identified:
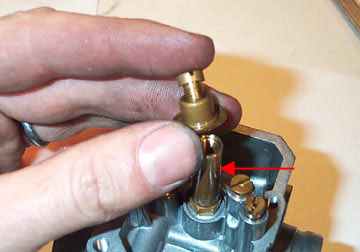
The first step is to remove the bottom
of the carb by removing the three screws that hold it in place. From
here you can remove the fuel bolt (red arrow) and remove the main jet
and atomizer (green arrow).
The most important modification is to
enlarge the fuel intake hole in the carb which has a half moon
restrictor cast into the aluminum carb body. To find where this is
located you'll need to look down the area where you just removed the
fuel bolt, pry out the small plastic fuel filter, and peer down the
hole. The plastic fuel filter can be disgaurded - if you are worried
about your gasoline not being clean then fit an inline filter in the
fuel line.
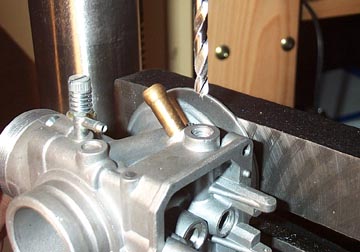
To open up the hole you'll need to
completely disassemble the rest of the carb and clamp it to a vertical
surface and drill it out using a drill press. My drill press has a
mounting plate that rotates to 90 degrees so I just clamped it to that.
Using a 4mm drill bit, carefully into the fuel intake hole as shown
above.
As you carefully drill down, look
through the hole where the brass needle seat went. Once you can clearly
see the end of the drill bit in this hole you have drilled far enough.
Remove the carb from the drill press and thoroughly blow through all
the passageways with compressed air or carb cleaner to remove any of
the aluminum filling created by the drilling process.
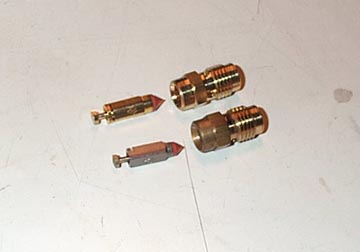
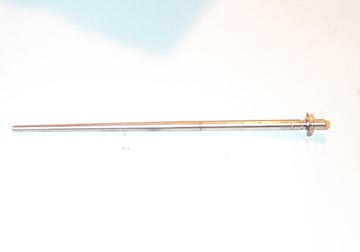
The next step is to fit a larger needle
and seat to allow the fuel through to the float chamber. The carb I
received had a 2.50 needle and seat, and MB recommend a 3.50 needle and
seat. In the picture above the larger needle and seat are shown on the
top and the difference is quite clear. The new needle seat needs to be
installed using a wrench or deep socket, and we can move on to the next
step.
The atomizer needs to be changed to a
DQ262 which is the 2nd leanest availabe, but the fuel starvation cure
has made more fuel available so it equals out. As you rebuild the carb,
fit the new atomizer in between the carb body, and the little hat and
main jet then screw into it. I left my main jet as a 140 and it seems
to be corrct for my engine.
The final step it use a K28 needle in the carb slide. There are three notches on the top of the slide and I fit the small C clip to the center notch to see how it goes. I'll post any updates on this page. Reassemble the whole carb and you should find you have a nice spread of power across the rev range without the previous hesitation and spluttering. Thanks to Ian at MB Developments for talking me through the process and then allowing me to share it on this page. Next Section --> |
||||||||||||||||
Carbs |
||||||||||||||||