


Replacing Cables
Vespa Clutch Cables - Non P Series
Vespa Gear Cables - Non P Series
Front Brake Cable
Rear Brake Cable
Lambretta Throttle Cable
Speedometer Cable
Vespa Choke Cable
Resources
Clutch Cable Replacement
This section shows a quick step by step of replacing a clutch inner cable on a large frame Vespa. To find out where the clutch cable is located at the motor end of the bike, have a friend pull the lever while you watch under the motor to see what moves.

As you can see on this oily
example, the clutch cable has been fraying at the pinch point and will
soon snap....probably on a rainy night miles from anywhere.

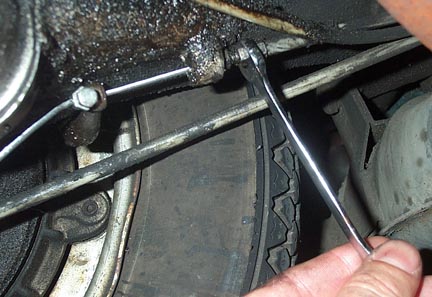
The first step is to remove
the existing nipple by using an 8mm wrench on the nipple body and a 7mm
wrench on the pinch bolt. Once slackened it can be pulled off the
cable, or just cut the cable if it is stubborn and wont come off.

The image above shows the cut
cable and the following parts: Red arrow: clutch arm, Blue arrow:
adjuster lock nut, Green arrow: threaded adjuster.

To remove the rest of the
inner cable, go to the clutch lever and remove the pivot screw while
holding the nut below from turning. Some older bikes use a flathead
slotted nut on the underside.

With the pivot bolt gone you
can remove the lever but be sure to note where the small washers are
located so that they can be put back in the same manner. Once the lever
is free simply pull on it to remove the inner cable and then disconnect
the cable from the lever.


Fit the lever, a little
grease, and the washers, and then pull on the motor end until the lever
goes back in to position. Fit the pivot bolt and securing nut.

At the motor end make sure the
new cable inner goes through the adjuster and the actuating arm. Back
out the threaded adjuster so that it is in the middle of its
range...meaning you could tighten it or loosen it equal amounts. The
image above shows that clutch arm a rest and it is spring loaded.

What is very important to
understand is that the clutch arm doesn't actually engage the clutch
until further in its travel. Push the arm with your finger towards the
front of the bike. You'll feel some resistance and then a very definite
stop. This is the green arrow area above. This stop point is where the
arm makes contact with the clutch and if you were able to push much
harder (in the red arrow area) you'd start to disengage the clutch.
Many people have emailed me making the mistake that the initial travel
is where the clutch arm is disengaging the clutch.

Slip on the nipple and pull on
the cable to make sure the lever at the headset is completely
disengaged. Then push the clutch arm forward until the red arrowed
point discussed before and tighten down the nipple. I find a very
useful tool for this is a set of Vise Grips. You can clamp them just
behind the nipple so your hands are free to tighten the nipple with the
8mm and 7mm wrenches without the arm moving back in to the green arrow
area.
The final step is to go up to
the lever and give it a pull. It should move about an 1/8 of an inch
before the arm is in the red arrow zone which you'll feel as the clutch
will become harder to pull. If you are in this area then you are good
to go. If not you can loosen the clutch adjuster locknut, and either
loosen or tighten the adjuster. Once finished tighten the locknut so it
doesn't move in the future.
When you take the bike for a
test drive, it should be easy to shift and not creep when in gear. To
test this change in to 1st gear on flat ground with the clutch fully
pulled in. If the bike tries to creep forwards you'll need to back the
adjuster out more. If the lever can't hit the grip when fully pulled or
if the motor RPM can climb not in rleation to the road speed, loosen
the adjuster.