|
 |
 |
 |
 |
 |
|||||||||||||
Tires |
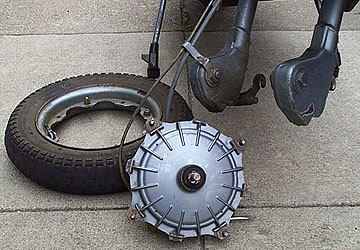
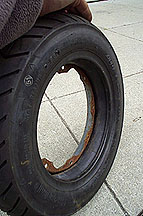
Tires - Lambretta Front TireThe Lambretta scooters have a two sided fork that means to fix a flat or change the tire the entire front hub needs to be removed. Tools - You will need:
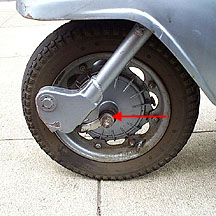
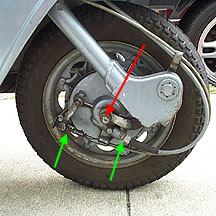
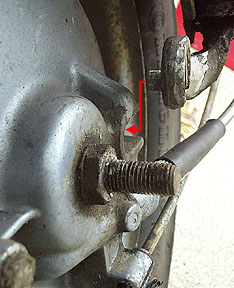
The first step is to remove the entire hub from the forks. There is a single 21mm on either side of the front axle that need to be loosened (arrowed below in red). The brake cable and speedometer cable do not need to be removed unless the hub is going to be worked on (arrowed in green). The forks pictured below are from an LI series Lambretta. The SX200, TV175, TV200 and GP200 will differ because of small damper mounted from the fork link to the forks on both sides. These will not need to be removed in order to change the tire.
Once the axle nut has been removed, there is a washer on either side which fits into a recess in the fork link. Sometimes these are a little tough to remove so they must be pried loose with a screwdriver or pliers.
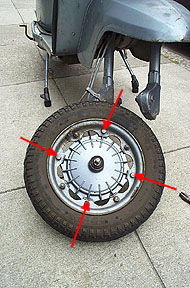
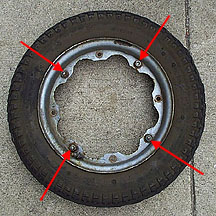
Now the entire wheel can be pulled back through the forks. A block of wood under each side of the stand is handy to get the wheel slightly up of the ground. Pull the wheel out allowing the brake and speedometer lines to follow without getting kinked, and lie the wheel down so that the brake and speedometer drive are facing down. There are 8 nuts visible on the rim of the wheel. 4 of these connect the two rim halves together and the other 4 connect the rim to the hub. Loosen the 14mm nuts which old the rim to the hub (arrowed - see below).
Remove the tire and rim from the hub and leave the hub still connected by the brake and speedometer cables.
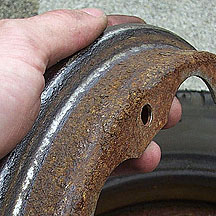
Next, remove the 4 13mm nuts that hold the two rim halves together as shown below with the red arrows below. The rim halves may or may not have a tight grip on the tire. If they do it is necessary to force the tire off the rim with a pair of screwdrivers. On this tire I also replaced the tube as the old one had been patched a few times and this is a good time to change it out as it costs under $10. Also, sometimes the inner face of the rim can be rusted and sharp flakes can puncture the new tube. I always scrape down the inside face of the rims to be sure that my new tube will survive.
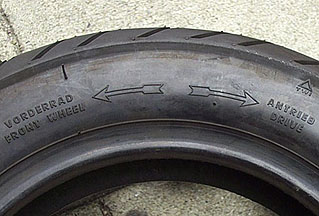
The tire I chose was a Continental Zippy-1 because eventually this bike will become a tuned TS1 engined bike and I would like to have a tire that can keep up with the performance of the bike. Cheaper tires are fine for standard machine and I have listed a bunch of tire manufacturers in the resource page. Some tires are directional and they must be installed to rotate in a certain way when installed on a scooter. On the Continental tire, it depends whether the tire is to be used on the rear or the front of the bike. There is a molded guide with arrows that must face in the direction of rotation. The easiest way to do this is to place it up against the bike in the way that it will be mounted. As far as I can tell this is more of an issue on a Vespa as the wheels are not reversible, but I believe a Lambretta's rims will go on correctly either way. See below for a close-up photo
Fit each side of the old rim to the new tire making sure that the air valve sticks through correctly. I always fill the tube just slightly so that it takes shape and makes pinching it less likely when the rims go together. To be sure, press both rims together and loosely fit the 4 nuts. As you tighten the nuts you can push the inner tube down so that it is not pinched with a flathead screwdriver - obviously don't push it hard enough to cause any damage.
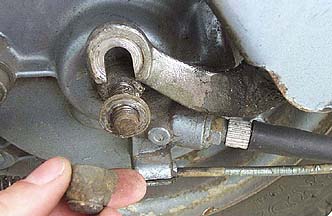
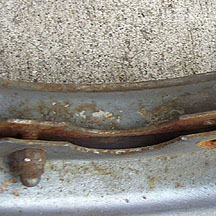
Once the wheel is pumped up (to about 18 PSI for the front) it can be refitted to the hub with the four nuts and lock washers. When the hub is refitted it is imperative that the stationary hub side is fitted correctly. On the right hand side fork link there is a large pin that must fit into a slot in the hub. This side of the hub must stay stationary in order for the brakes to function. See the photo below that shows the pin and the slot in the right hand side of the wheel hub.
The final step is to fit the washers and tighten the two axle nuts on both sides of the threaded axle. Next Section --> |
|||||||||||||||||