Lambretta Series 1 - 3 Fuel Tap
I haven't found a way to
remove the fuel tap from a Lambretta without removing a couple of body
parts but I am guessing there may be an easier way. If you've found an
easier method for removing the fuel tap, please let me know.
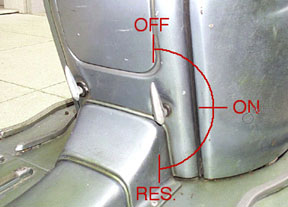
The fuel tank runs across the
frame and has a small valve on the left hand side just above the
carburetor. This is linked to a cast aluminum handle on the frame below
and to the left of the toolbox door. The handle is used to turn the
fuel valve from off (up), to on (sideways), to reserve (down).
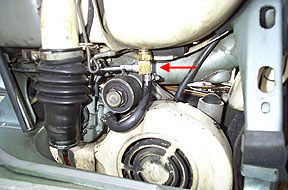
The valve sticks up into the
tank by about 1 1/2" so I've found it necessary to remove the left hand
running board and the fan/flywheel cover. The board is removed by three
nuts from below. The fan cover has about four screws into the engine
casing which also must be removed.
Once these are removed make
sure the valve is in the off position and disconnect the fuel line from
the carb. These lines can often be brittle, but are cheap and easy to
replace if needed.
Drain any fuel in the tank
into a container by turning the tap to reserve and letting gravity do
its trick. The last step before the fuel valve removal is to remove the
linkage to the exterior frame handle by removing one of the cotter pins
in the linkage.
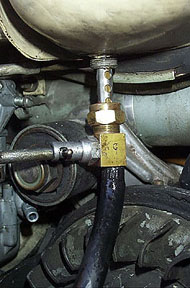
The valve contains a brass nut
which pulls the tank and valve together when tightened (the tap portion
is reverse threaded). Loosen the brass nut all the way and the fuel tap
should pull out along with the brass filter and reserve tube. Use some
of the drained gas to clean any rust or other material from the gauze.
Pressurized air is also useful to blast out the valve passageways.
If the valve is truly blocked,
try removing the rotating part connected to the linkage to get access
to the rubber gasket and fuel passageways. There is also a spring in
this assembly so be careful when you are initially loosening the nut
from the valve body.
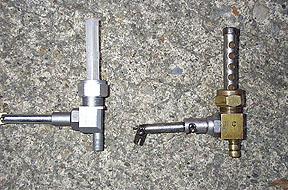
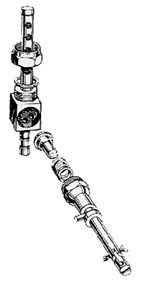
I replaced my valve because it
was leaking badly even after replacing the internal seals. I found that
WCLW had a part from a newer bike which would do
the trick. For the true enthusiast this may not be an option as the two
parts look slightly different. The one on the left (pictured below) is
the new valve compared to the original on the right.
Refitting the valve is the
reverse of the disassembly. Make sure to use a new felt compression
washer in between the tank and the valve. Before tightening the main
nut, unscrew it all the way before screwing it back on for about a
single turn. This should give you the clearance you need to let the
reverse thread on the tap and the normal thread on the tank force a
nice tight seal between each other.
|


